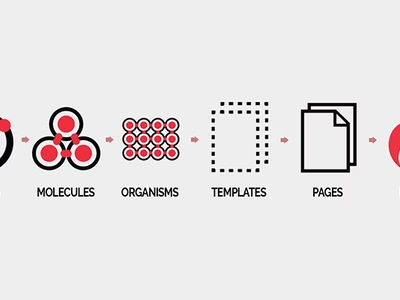
Atomic design components from atoms, through molecules, organisms, templates, pages to Drupal.
Calendar   22 August, 2018 //

10 lessons from using Drupal 8 + Pattern Lab + Emulsify

#Drupal
#Frontend
#Review
Darren Fisher, Creative Director at Pivale - a bearded man with dark hair and glasses.

Written by

Darren Fisher

Creative Director

Share Arrow down

Last month we launched our first in-house Drupal + Pattern Lab project, and it was an exciting process. From the client giving us the go-ahead we had nine weeks to design, build and launch the entire site from scratch. I knew early on I wanted to use pattern lab after being involved in a large Drupal project last year via another agency which also implemented pattern lab.

There were two key differences between that project and this one, though.

The first was that on that previous project I was part of a much larger team including developers (front and back-end), designers, project managers etc. whereas on this project I served as designer, front, and back-end developer and project manager. This allowed me to work quickly and rapidly prototype whilst keeping in constant communication with the client.

The second was that on that previous project I was tasked with creating the base theme which would incorporate the pattern lab build which had already been created by the designer, whereas on this project we opted to use the Emulsify base theme from the team over at Four Kitchens and build the pattern lab inside of an empty Drupal install. Emulsify already has something of a community around it, and the developers at Four Kitchens have already solved a lot of the common problems one might face when trying to integrate pattern lab into a Drupal theme.

If you'd like to know more about why you might use pattern lab I've also written a client-focused follow up to this article called 'What is pattern lab and why should I care about it?', but for now, let's get into the ten lessons learned from our first ever Drupal 8 + Pattern Lab project via the ✨glorious✨ Emulsify base theme!

Emulsify Drupal Theme Logo by Four Kitchens.

Lesson 1: Harness the power already inside Emulsify 💪

TL;DR: Emulsify is awesome and will save you time! Download it and use it to its full effect!

Emulsify is a Drupal base theme from the team over at Four Kitchens and it solves a whole heap of headaches when it comes to integrating pattern lab into a Drupal install. The documentation is thorough but easily digestible and understandable.

So what does Emulsify come with that justifies using it as your Drupal base theme?

Here are my top Emulsify features which make it the go-to base theme for integrating pattern lab in to Drupal.

  1. Emulsify ships with a custom twig function which makes using BEM class names painless.

    The use of this function is documented in great detail in a four kitchens blog article and herein lies my first and most painful lesson. I didn't fully understand how the function worked when I started out on the pattern lab for Adelco so I dismissed it and stripped it out of a lot of components. It was only when I later came to import atoms such as images and headings into larger molecules and organisms that I realised why I needed this function - to achieve something like the following on import of the image molecule:

    <div class="slider">
      <ul class="slider__slides">
        <li class="slider__slide">
          <img class="slider__image" src="img.jpg" alt="A regretful developer" />
        </li>
      </ul>
    </div>
    

    Without Emulsify's BEM twig extension, I could not override the base class of the nested image atom inside the slider:

    <div class="slider">
      <ul class="slider__slides">
        <li class="slider__slide">
          <img class="img" src="img.jpg" alt="A regretful developer" />
        </li>
      </ul>
    </div>

    Sad front-end developer! 😞

    In summary - understand and use the extension and you'll be a happy frontend developer! 😊


  2. The basic pattern lab components and their Drupal counterparts are already in place in Emulsify!

    The Drupal base theme provides several useful components out of the box such as images, menus, headings (and a whole lot more) and the accompanying Drupal templates have already been overwritten and plumbed accordingly so you can quite literally start working on the pattern lab and see the results directly inside the Drupal build as you go.

    I can't stress enough the advantages of building the pattern lab inside an empty Drupal project so that you can utilise the work Four Kitchens have already done in Emulsify, otherwise you'll be stripping it all out and replacing it with your own pattern lab and then plumbing a lot of these basic templates manually which will drastically reduce initial progress (as it did on the project I worked on previously).


  3. Emulsify has a solution for Drupal's javascript behaviors (Drupal.behaviors.*)

    If you're familiar with Drupal's javascript behaviors then you'll appreciate that getting them to work outside of Drupal probably isn't going to be a lot of fun. It's beyond my level of understanding how Four Kitchens achieved this but you can write native Drupal behaviors inside of the pattern lab and they'll work both in the pattern lab UI and inside of Drupal (providing of course that you import them via the libraries yml in the theme root.


  4. Emulsify has an SVG sprite generator

    If you're not using SVG sprites for icons then I can only say I can't recommend them enough and you should check out the CSS Tricks article on how to use them. On previous projects, I've always manually compiled the sprite file which can be time-consuming and a pain if you want to amend a particular SVG icon or remove one altogether.

    Emulsify ships with an SVG sprite generator. You simply drop one or more SVGs in a directory and run gulp icons and your sprite sheet automatically generates with the symbol IDs generating from the file names. For example cog.svg would become <symbol id="cog"> inside of the sprite! Removing or amending symbols in the future becomes as simple as editing the source file in the source directory and running the gulp icons command again! Easy peasy!

A seedling growing in a pile of soil in the palm of a person&apos;s hand.

Lesson 2: Start small and grow 🌱

TL;DR: Don't build an extensive pattern lab which has all the bells and whistles which may not make it in to the final project. Treat the pattern lab and design process as an ongoing concern for the life of your project.

It's all too easy to get over-excited about creating or customising the base Emulsify components and then realising post-launch that you never actually implemented them and wasted your precious time. This is what happened to me. I spent a good quantity of initial design time working on the accordion component Emulsify provides only to realise that we didn't require this component at all on the actual live site.

This was a rookie mistake especially because there were other things I could have perhaps optimised further or improved had I not wasted that time, but it has taught me a valuable lesson.

Starting small is important and treating the pattern lab as a process rather than a tool to gain design sign off is essential. Next time I tackle a pattern lab I'll be starting with the essentials to get the site up and running with a functional front end, instead of trying to cover every base before beginning the site build.

A good starting point is probably to ensure that any images, text, colours and fonts are defined and then turning attention to menus, header and footer components to integrate these into Drupal. This would ensure that the Drupal build begins with at least a functional header and footer, before diving into individual page components such as paragraphs, hero images and widgets etc.

An animated image showing the Adelco pattern lab in action on multiple devices.

Lesson 3: Utilise pattern lab's server to test multiple devices 📱

TL;DR: Utilise the pattern lab server to make cross-browser and cross-device testing efficient and impressive for your clients.

The node server bundled with Pattern Lab is a seriously useful tool! When using emulsify you can fire up the node server from the theme root by running npm start which will then give you both a local and external server access point.

The external server address allows other machines on the same network to connect to the server via a URL meaning you can set up a device lab to test the designs on different devices and browsers, natively. Scrolling on any one of the devices causes all of the others to scroll at the same time and using the menus causes all of the connected machines to follow suit.

This isn't just incredibly useful to you as a front-end developer, but also hugely impressive to the client should they visit to check in on design progress. Our client was immediately engaged and excited by the process and able to see with their own eyes that we were extensively testing across a variety of devices and browsers.

It's so quick and easy to set this up, and the benefits are endless. ?

A ground hog looking at the camera.

Lesson 4: Keep the pattern lab DRY ☔

TL;DR: Don't learn this lesson the hard way, like I nearly did. Keep it DRY, and it will always be a breeze to pop back later and build upon what you already have!

No one wants a groundhog day situation; especially when it comes to code. Ideally, you want to write something once and re-use it again and again. This is otherwise known as keeping it DRY (don't repeat yourself). So I'm guessing I'm preaching to the choir, but let me tell you what happened to me when I got a little bit lazy under pressure towards the end of our first pattern lab project:

I needed to add a content block to the footer which included some brand images and I figured I could do this quickly by spinning up a new pattern lab molecule and hard-coding the images (as they didn't need to be controlled by Drupal) so I did exactly that. And in my haste, I literally hardcoded the images; as in manually wrote out three image tags and just dropped in the src and alt attributes and moved on to the next thing.

A few days later I was running some performance audits and decided to implement image lazy-loading as a nice performance enhancement to the site. I was so thrilled in the knowledge that due to the implementation of pattern lab on the project that all I'd have to do was amend the image atom component and the lazy-loading would just work across all the images on the site, but of course, I was thorough and did a quick search on '<img' in the pattern lab codebase and to my horror saw my hard-coded images in the brand images block.

Luckily it took me a few minutes to re-implement the block using proper import statements to get the actual image atom components which now had the lazy-loading functionality. I'm grateful that in this instance this wasn't a lesson learned hard, as it was quick to rectify, but imagine if I'd done this through several components ?!!

A graphic demonstrating uploading to the cloud..

Lesson 5: Get the pattern lab online as early as possible 🌐

TL;DR: Get the pattern lab online as soon as possible and you'll find collaborating and testing much more efficient.

Hopefully, this one is a no-brainer, but I'm often surprised by how long it takes some agencies to get things up online. We always try and get a site (and the accompanying pattern lab in this case) on to a dev environment within a few days of development as this allows our clients to monitor progress and the team here to test functionality on a remote integration environment after deployments have been made.

In the first two weeks of the project, I was making anywhere between 10 and 50 commits a day to the pattern lab and it was invaluable for the client to be able to visit the pattern lab UI at any given time and see the progress that was being made. It also allowed us to discuss certain design decisions over the phone, without the need for screen sharing.

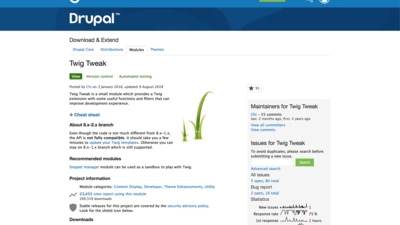
The Drupal splash page for the Twig Tweak module.

Lesson 6: Use Drupal's module ecosystem to improve integration 🔑

TL;DR: Don't reinvent the wheel. The Drupal module ecosystem is your friend when it comes to integrating your pattern lab into your Drupal project.

We all know that Drupal's ecosystem is one of Drupal's biggest benefits. Emulsify is absolutely a testament to that but connecting everything together is where the power truly lies. There are a whole bunch of Drupal modules which make working with Twig and pattern lab a lot easier. Here's a list of some of my favourites:

  1. Twig Tweak

    Personally, I couldn't live without this module. This allows you to print entities inside of twig templates such as views, fields, nodes, blocks - whatever you want.


  2. Twig Field Value

    This module allows you to call the actual value of a field which is often all you require when plumbing data into pattern lab components.


  3. Twig Extensions

    This module gives you more twig extensions to work with, giving you more control over text, arrays and dates.


  4. Twig Typography

    This module gives you all of the power of the PHP Typography library inside of Twig. You can control space better and intelligently replace characters amongst many other useful typical typographical requirements.


  5. Twig Render This

    This module gives you a really neat way to render specific fields if that's something you need to do as the view() method is blacklisted in Twig by default. Beyond this, you also get access to the specific view modes which is a really nice touch.


  6. More Global Variables

    This module gives you some global variables that can be then printed in any twig template. For example, if you wanted to print the current page title as the last menu in a breadcrumb, you could print {{ global_variables.current_page_title }} in breadcrumb.html.twig.


  7. Bamboo Twig

    I've not used this module on this project but it looks very promising and I intend to look into it on our next Drupal 8 project.

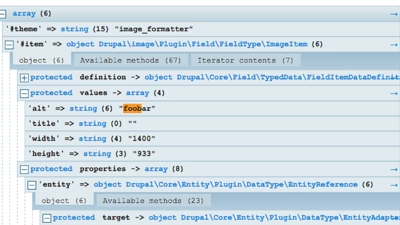
An example variables dump from Drupal Twig&apos;s Kint function..

Lesson 7: Get to grips with Drupal's data structures 🏗️

TL;DR: You're going to need to spend your time in Drupal's Twig templates, often using colourful language, before certain things will start to click together, but using devel and kint and knowing about the magical 'entity' keyword will speed up this ghastly process!

Drupal's data structures can seem a bit mad when you're inside a Twig template and you just want to get to data, but when you understand the object-oriented nature of Drupal 8 a bit better, and that most things are entities, there are some nifty tricks that you can employ to get to data inside of Twig templates without resorting to PHP preprocess.

Let me begin with an example from the previous project I worked on because I can directly compare it to the pattern lab we've just launched and our solution on this project was significantly cleaner. Both projects implemented paragraphs (the module) to create content and the media module to handle files, videos and imagery. Here was a typical entity reference chain we need to traverse in order to get to the data we needed to populate a pattern lab component.

PARAGRAPH > IMAGE FIELD > MEDIA ENTITY > FILE ENTITY > FILE URI

In order to access the URL for an image on a paragraph, we needed to do lots of entity hopping in order to reach the file entity and convert its URI value. On the previous project, we were doing this via preprocess due to the nature of the entity reference chain:

<?php

use Drupal\file\Entity\File;
use Drupal\image\Entity\ImageStyle;
use Drupal\media\Entity\Media;

/**
 * Implements hook_preprocess_paragraph().
 *
 * full_image paragraph type.
 */
function themename_preprocess_paragraph__full_image(&$vars) {

  /** @var Paragraph $paragraph */
  $paragraph = $vars['elements']['#paragraph'];

  if ($paragraph->hasField('field_image') && $paragraph->field_image->count()) {

    // Load the media entity and image file entity.
    /** @var Media $media */
    $media = Media::load($paragraph->field_image->target_id);

    if (is_object($media)) {
      /** @var File $file */
      $file = File::load($media->field_image->target_id);

      if (is_object($file)) {
        // Lookup the image style from the active config object.
        $image_style = \Drupal::config('core.entity_view_display.paragraph.full_image.default')->get('content.field_image.settings.view_mode');

        // Define the variables usable in the template
        $vars['full_image']['url'] = ImageStyle::load($image_style)->buildUrl($file->getFileUri());
        $vars['full_image']['alt'] = $media->field_image->alt;
      }
    }
  }
}

But it turns out there's a magic entity keyword in Twig which allows us to do all of the above in a much more simple process right inside of the TWIG template:

{% include '@organisms/paragraphs/image/image.twig' with {
  "img_src": paragraph.field_image.entity.field_media_image.0.entity.uri.value|image_style('medium'),
  "img_alt": paragraph.field_image.entity.field_media_image.0.alt,
} %}

Imagine my despair at how much preprocess code exists in that previous project, knowing you can magically traverse an entity reference chain right inside of TWIG ?!

There are many Drupalisms that you just have to learn in order to get to the data you require, and as mentioned in Lesson 6, there are modules which will help with this as well. Essentially the devel (and its bundled devel kint module) are going to be essential to mining through the data structures to get to where you need to.

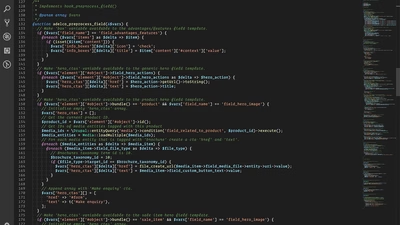
Some example preprocess code.

Lesson 8: Drupal preprocess FTW! 🎉

TL;DR: Sometimes you'll chase your tail in Twig trying to get something done. Learn to judge quickly whether something should be done in the theme preprocess or directly inside of the template.

Lesson 7 discussed why you don't need to jump into PHP theme preprocess hooks to do a lot of things but sometimes it just makes sense to prepare your data and manually create the variables you need, and there's no getting around this. If you're a Drupal front-ender who has been avoiding PHP then this is the news you didn't want to hear... You need to jump into PHP on occasion!

Sometimes inside a pattern lab template, you'll find yourself looping through data instead of importing another component inside of a loop. A good example of where we've done this on the Adelco pattern lab is when a paragraph references another paragraph such as on our timeline component. The timeline itself is a paragraph which is composed of timeline items which are each their own paragraph entity revision.

There's no easy way to map this data when porting to Drupal as you can only map a root variable and not something nested. For example, the following is invalid: "something.something_else": path.to.the.data, so in order to create a root variable, we need to do this in a preprocess hook. Let's take the timeline example so I can show you what we did in preprocess in order create the variables the pattern lab component was expecting:

/**
 * Implements hook_preprocess_paragraph()
 *
 * @param array $vars
 */
function adelco_preprocess_paragraph(&$vars) {
  // Make a short variable for paragraph type testing.
  $type = $vars['paragraph']->getType();

  // Make 'moments' variable available to the timeline paragraph template.
  if ($type === 'timeline') {
    foreach ($vars['paragraph']->field_timeline_items as $delta => $item) {
      $vars['moments'][$delta]['date'] = $item->entity->field_date->value;
      $vars['moments'][$delta]['title'] = $item->entity->field_heading->value;
      $vars['moments'][$delta]['copy'] = $item->entity->field_copy->value;
    }
  }
}

The other way we could have solved this problem was to create another pattern lab component for each timeline item but that felt a little like overkill so it made sense to preprocess the data in this instance.

A lego man looking frustrated next to a laptop.

Lesson 9: Know when to leave it to Drupal ✋

TL;DR: When Drupal core or a contributed module does a whole bunch of legwork to bring you a front-end widget don't spend hours re-creating it in pattern lab. What's the point?!

Drupal does some stuff so well it's not worth fighting against it just to implement your own version of the same thing in pattern lab. The simplest example of this would be the video embed module which takes a YouTube, Vimeo (or any number of other video providers) URL string and converts it into an embedded player using some site-wide settings.

It's almost certainly easier to leave Drupal's field implementation in place for a module like this because if you don't you can end up destroying all of the custom settings from the Drupal's UI. You could pull out all of these custom options and use them in your own custom implementation in pattern lab but, I'd argue, what is the point? To demonstrate video in pattern lab I used a twig block wrapper around a complete embed code and then when importing the component into Drupal just rendered the video field inside of that Twig block.

Another instance where I decided not to try and be too clever was with the EU cookies popup. Drupal has a fantastic contributed module called EU Cookie Compliance and this does a lot of the heavy lifting for you in terms of setting the cookies and allowing the user to customise the text inside of Drupal's UI etc. In order to customise this in pattern lab, I reverse engineered it by pinching the template code from the module and recreating it in pattern lab and from there imported it to my theme in a template override.

I also did this on the previous project I worked on for a lot of Drupal Commerce widgets, as it's not worth investing hours of development time to achieve something which is already working in Drupal and has no doubt already had hundreds of hours of scrutiny from developers far more meticulous than me!

The sign up screen for Drupaltwig on Slack.

Lesson 10: Utilise the Drupal community on Slack 🧑‍🤝‍🧑

TL;DR: There's no greater resource for skilling up in pattern lab, twig and Drupal front-end stuff than the Drupaltwig slack workspace. Join us if you're looking to do anything pattern lab related in Drupal.

Last and definitely not least (in fact probably the most important lesson of all) is to utilise the amazing community of people already working with Pattern Lab, Twig and Drupal. Over at the Drupaltwig slack, you'll find the creators of the Emulsify base theme as well as many other knowledgeable Drupal developers who have been using pattern lab a lot longer than I have!

You'll find the community very welcoming and more than happy to help you out with any issues you might have.

Even if you don't engage with the community there, you'll still learn loads just from the conversations that occur back and forth.

Darren Fisher, Creative Director at Pivale - a bearded man with dark hair and glasses.

Written by

Darren Fisher

Creative Director

Darren is our creative director, responsible for our design and frontend development team as well as managing the majority of our website and multisite builds. Darren is a graduate of the University for the Creative Arts, achieving a bachelor's degree in Digital Screen Arts.

Related articles

More recent articles

Bring yourambitionto a free consultation

The Pivale team, from left to right - Adam Keywood, Daniel Johnson, Barry Fisher, Darren Fisher, Pri Scarabelli and Jules Manning.

Start a conversation